
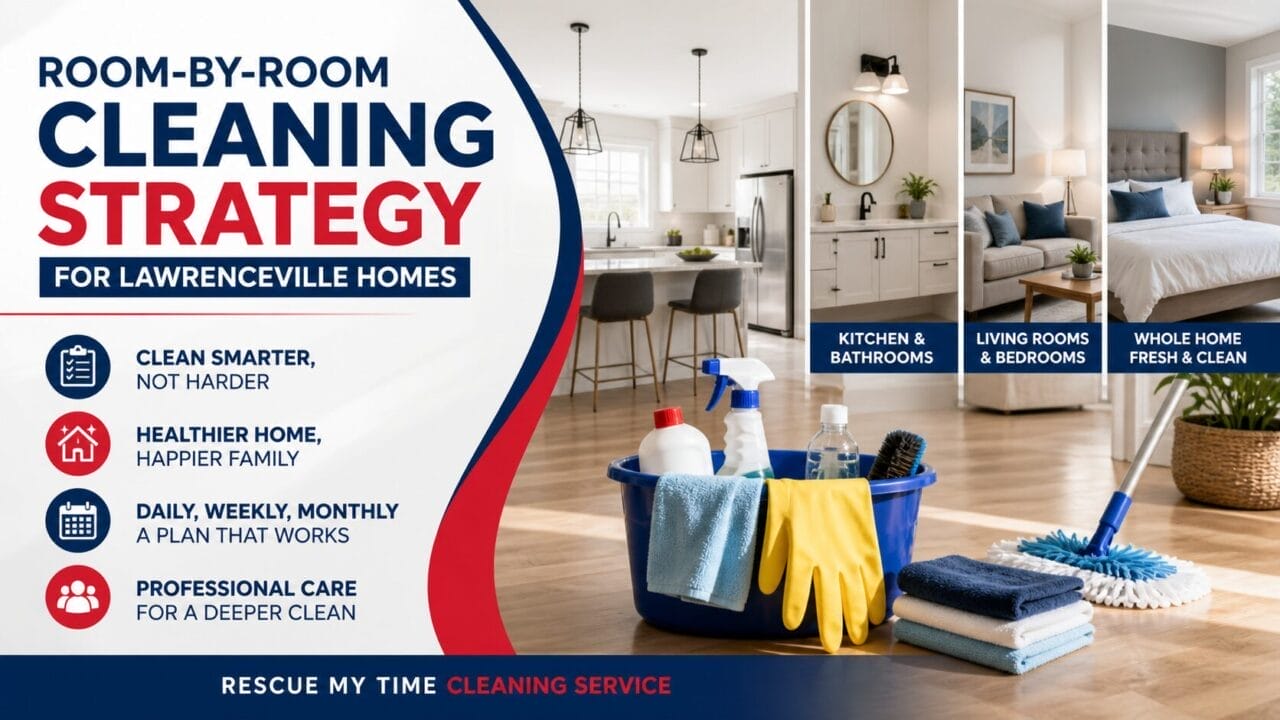
A Homeowner’s Guide to Decluttering a Room Quickly
Whether it is organizing a closet or decluttering a room, the clear-out chore can fill us with dread.
Not because of the task itself but the dread of the stuff we might find and have to decide whether to keep or say goodbye to for the last time.
If you are wondering how to declutter your room or maybe how to declutter a kid’s room, then take a look at our guide to keeping your home organized.
We will take you through the steps you need to get your room from stuffed full to stuff-free in no time.
Step 1A – Remove Everything from the Room
It feels like a dramatic start but to really get the ball rolling, you need to commit. This is a big step, so don’t plan to only half do this job, or else you will be left with a big mess elsewhere in the house.
Take everything out of the room you want to declutter. This can include furniture if you want a completely blank canvas. You also need to empty drawers, cupboards, and storage spaces.
As you remove things, have a three-pile or box system. Have one for stuff to trash, one for stuff to donate, and one for stuff to keep. As your start your sort through, try to put things immediately into their relevant boxes.
We will sort more thoroughly in a later step.
Step 1B – Half and Half
If you do not have space or time to remove everything from the room, you need to work on a half and half basis. This is the better plan if you want to declutter a room in 30 minutes or so.
Clear a workspace. You can do this by piling everything up into one half of the room. Then work your way around the room from the clean side to the messy side.
Start with one drawer or cupboard at a time and work your way methodically around the section.
You still need to apply the three-box method and donate things you no longer use, throw out stuff that is broken and keep the things you need.
One good thing about this method is that it is entirely contained within the room you are working within, so you can stop at any time and come back to the project.
It is advisable to try and do the whole project in one go, however. We tend to have a habit of procrastinating on these cleanup projects, and walking away halfway through gives you an excuse to do just that!
Step 2 – Plan Your Room
Once the clutter is out, it is time to start making a plan for how you want to room to function. This is the time to move the furniture and have a deep clean of the room.
As everything is out, if you want to, you can clean the carpets, curtains, and baseboards. It is time to do the jobs that are made more difficult by the clutter.
You can also replace furniture at this stage as you will see what fits with your scheme and what does not.
Take a look at your power outlets and where they are located. This is a good time to reorganize electrical equipment so that unattractive cables are not snaking across the floor and certain outlets are not overused.
Step 3 – Assess Your Piles
Before your clutter can start to go back into the room, you need to really go through what you have and take a long hard look at what you really want.
You may have heard of the Marie Kondo method of seeing what sparks joy. This involves holding an item and deciding whether it makes you happy or ‘sparks joy’ inside you.
Ask yourself whether you use an item or love an item. If you feel something when connecting with the item, then it is something you will want to keep.
Be careful of the following thoughts. It can be difficult to let go, and many questions will fill you with doubt. For example:
“This was a gift that I have never used, but it was a present from X, so I can’t get rid of it.”
You have never used it. You never will. Time to give it to someone else.
“It works fine, so I don’t want to throw it out. I never use it and don’t need it… but I might in the future.”
You might, but much more likely, you won’t. If you really need something similar in the distant future, you can always repurchase it.
Go with your gut choices as they are usually correct. Don’t keep something if it doesn’t feel necessary to do so. It can be hard to let things go, but once it is gone after an hour or so, you won’t think about it again.
When you permit yourself to keep something, your heart has to be 100% in it. If it is not, time to make like Elsa and let it go!
Step 4 – Organize Your New Room
Once you have your vision for your new room and have decided what you will keep, it is time to move everything back into the room.
Try and combine things by themed groups if possible to keep your belongings organized. Allow space to breathe in the room. You do not need to fill every little space with something.
Ensure that everything you move back in matches the plan you made for your room in Step 2. If it doesn’t fit, time to reassess and see if you really need to have it in your life.
Once everything is back in the room, you are done! Congratulations.
Decluttering a Room Should Be Fun
At first, decluttering a room may seem like a terrible chore, but it doesn’t need to be. Likely this feeling is trepidation at having to make some tough decisions over which belongings you really want to keep.
Once you have made the first steps, it will get easier, and you will love your new space when it is finished and easy to use.
Want your house to look its best? Look at our cleaning services page and see how we can help keep your household looking sharp.
Share this article
Related Posts


Follow us
A quick overview of the topics covered in this article.


